Upload a File to Server Qlik Sense
A while back, I blogged on Sending HTML Content via Electronic mail from Sense. What if that aforementioned HTML could exist written to a spider web server to be picked up? What if you lot already had that web server available, in the shape of your Sense Enterprise Server? Read on to detect out how to create data driven wall-boards and get data to users who don't require Sense licences.
The Requirement
Qlik Sense is a spider web-based application which delivers interactive information to users through a web interface. One upshot though, is that every user who accesses that information requires a licence. Sometimes in that location are users who have no interest in drilling into the data, or desire to become under the pare of the numbers, simply just need some static data. Wall-boards are a perfect example of this, equally typically they are on screens that can not exist interacted with. Paying for a licence in these cases does not make sense.
NPrinting offers a fantastic solution for this, allowing you to schedule the cosmos of image files, spreadsheets and HTML, to build pseudo interactive pages that can be deployed via a website (or electronic mail, or file share etc.). NPrinting also carries a price tag though and may exist overkill in some cases.
What if we could merely use Sense to build dynamic pages and pass the URLs to the people who need the static information?
Well, we tin can.
Read on to find out how to do only that. I volition also share a little time-saving trick for creating simpler URLs for your users.
Using a Content Library for HTML
The primary purpose of Content Libraries in Qlik Sense is to store images to exist used as thumbnails inside Sense applications. When you upload files to a Content Library they are bachelor on a URL on your Sense server, allowing them to be used in applications. If yous upload a slice of HTML this volition be displayed at a URL and be rendered as a spider web page.
To fix your content library become into the Sense Enterprise Management Console (QMC). From here select the Content Library carte du jour.

One time here you should see the default Content Library, any libraries which take been created past the Dev-Hub or custom libraries that you have created. Click the Create New to create a new library.

Requite the library the name HTML and click Apply.

Once your library is created, ensure it is highlighted (with a black bar) and then click Edit or double-click. Here you tin set some properties for the library, including whether it is available for users within Sense. This does not come into play, though, with regards to files being available on the site. Users will need to be authenticated with Sense though in order to view whatsoever files.
From here we want to upload a file, so click the Contents menu on the right.

Our goal here is to accept dynamically updating HTML, being written from the Sense load script. Earlier we tin can do this, still, nosotros need to get an entry for whatever files we are going to be writing in the Sense database. In order to do this, we need to upload a stub of the file to the Content Library. If you only accept a static file (say a assistance page for your app) uploading it hither is all yous demand to do. If it'south dynamic, you will need to carry on with the steps beneath.
To upload the file, click the Upload button, click Choose Files, select the file and so click Upload once more.

When you lot see the uploaded files yous should also run into columns which show you where the files have gone on your Server and where they are bachelor as a URL.
And then, if nosotros upload a file chosen wallboard.html users volition be able to become to that file at https://your.server.name/content/HTML/wallboard.html. Requite this a endeavor to bank check that information technology has worked okay.
The file is written to a location shown in the QMC as %StaticContentRoot%\Content\HTML\wallboard.html. The %StaticContentRoot% part refers to a location within your Sense share, which would take been created when the server was installed. If you don't know where this share is, notice an administrator who does. Under that share will be the path \StaticContent\Content\HTML\, and in that folder you volition find your file.
Creating a Connection to the Content Library
All reading and writing to locations in the Load Script is done via libraries (unless yous are happy with the risks of enabling Legacy Mode). You will therefore need to create a Folder connection to the HTML Content Library. This needs to exist washed within the Load Script Editor of an App.
Click on Create Connection and then select the type of Folder.
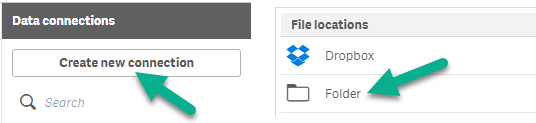
The path needs to exist the path to the HTML folder which is referenced above (note the bulldoze letters in this example refer to the drives in the server, not your machine). Give the connection the name HTML. When consummate select Create.

A quick tip, not entirely related to this post: in one case you have created your connection go into Information Connections in the QMC. Hither you lot can discover the library you have but created and rename it, and then that it doesn't take the username of the person who created the Library in the proper noun. This makes for tidier load scripts, less typing and less chance of errors slipping into scripts. Y'all will demand to refresh the browser page with your load script before you can use the newly named library.
Once the library is set upwards correctly we tin create dynamic code to update the HTML file nosotros have created in this section.
Building Your HTML
Compiling data in the Qlik Load Script and then writing that to a file is something that I covered in my blog mail Sending Data From the Qlik Load Script. In this example we were edifice a table to become in the body of an email, the aforementioned process can be used to build a static web page.
Rather than re-writing the instructions for creating the HTML I will refer you lot to the previous mail service. You tin can ignore annihilation to practise with QWC, SMTP and encoding of strings. Y'all can therefore gyre straight on down to the department titled Get Some Data.
The post talks y'all through obtaining some data, aggregating that, making it into HTML and writing to a file. The HTML yous accept in the header will exist dissimilar (y'all can utilise a link to CSS, for example), only other than that the process will exist the same.
When you lot come to write the table yous take built, Shop it to the HTML Library you created in the concluding department.
Once you have re-written your HTML bank check that it has refreshed using the URL from the previous section.
Improving Your Output
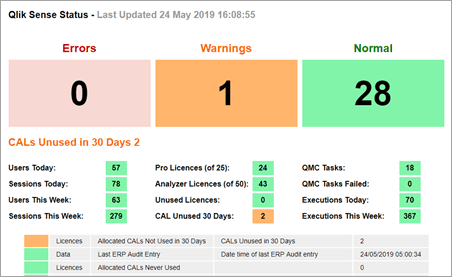
Sending text-based data, and styling are all relatively straight forward to work out. Nosotros use this technique to provide clients with a HTML-based wallboard to keep tabs on the condition of their Sense server. The output looks like this:
With a bit of knowledge around HTML and CSS you should be able to create charts in the output yous produce besides. When I posted the blog post on sending data, Héctor Muñoz suggested a machinery for getting charts built on the fly. He describes how to achieve this in his web log post here: http://weblog.datanrock.com/2018/12/05/transport-charts-from-qlik-load-script.
In the header of the HTML yous are writing you will desire to put a HTML tag to become the page to refresh. This is simply achieved past adding the following tag to the header of the HTML you write out:
<head> <title>Automatic Sense Wall-Board</title> <meta http-equiv = "refresh" content = "60; url = https://your.sense.site/content/html/wallboard.html" /> </head>
This will refresh the output every lx seconds, so every bit presently as Sense writes a new folio it will exist picked upward.
By putting together all these pieces you tin can have a constantly updating page to sit on a user's screen or an unattended wall-board. All without consuming i of your Sense licences.
Quick Sense Web Redirect Hack
Now we accept a web server to hand, and the code above to practice a redirect, why not use this to create short-cuts to apps and pages within your Sense site. To practice this merely create a HTML file with a short proper noun, with the header as above. In the place of the URL put the URL of the app you want to redirect to and swap the threescore out for a zero. Your much shorter URL will read like https://your.sense.site/content/html/kpi.html, just it will go straight to a page of analysis (or even a single nautical chart) which would otherwise crave two large GUIDs in the URL to get to.
Ready up curt-cutting redirects for all the key pieces of analysis contained in your site to permit sending of shortened URLs around your business organisation, making information technology much more efficient for staff to find the numbers they are looking for.
Share This Story, Choose Your Platform!
Source: https://www.quickintelligence.co.uk/qlik-sense-web-server/
0 Response to "Upload a File to Server Qlik Sense"
Post a Comment